Wednesday, January 29, 2014

WIP Wednesday #30 - LEGO Captain America

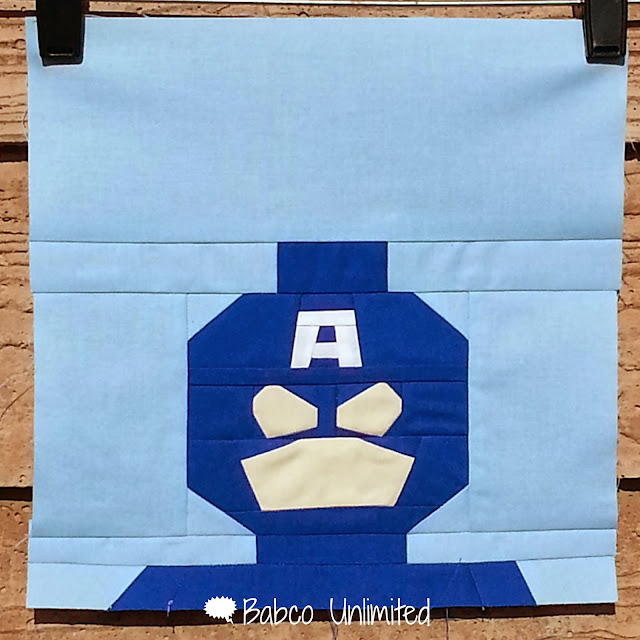
Isn't this awesome?
BabcoUnlimited.blogspot.com - LEGO Captain America Quilt Block
Lego Captain America Quilt Block

Kristy over at Quiet Play was asking for testers of her new LEGO Marvel Superheros patterns, and I quickly raised my hand. Pick me! Pick me! She sent me her pattern for Captain America, and I got right to work.  Her pattern was so easy to follow. This looks like it would be difficult, but it was really super easy. 

Once I finished this, C told me I should think about doing Iron Man next. So, I showed him Kristy's patterns for other Marvel Superheros here. His exact words were, "You have to make these." And "Can I have it?"   

She has a huge selection of LEGO Star Wars characters available in her Craftsy store. I made the mistake of showing those to hubby. He has strongly hinted he would really love a quilt like that. 

Now, I need to test my skills at embellishing this with eyes and a mouth. Yikes! 
Wish me luck because I have no idea what I'm doing.

Linked up with Freshly Pieced here.
Linked up with Quiet Play here.

Tuesday, January 28, 2014

Tuesday Tip #4 - The ABSOLUTE BEST Way to Rip Out Stitches

BabcoUnlimited.blogspot.com - Tuesday Tip, How to Rip Out Stitches, Quilting Hack


When I first learned to sew, I quickly learned the need to "unsew." I was self taught, and it wasn't pretty. I'd yank and pull on the fabric, sometimes accidentally gouging the fabric with the seam ripper. It was ugly.

Then I learned the absolute BEST way to use a seam ripper. As a result, my fabric is left pretty and undamaged. And it is super fast with minimal work.

  • STEP 1
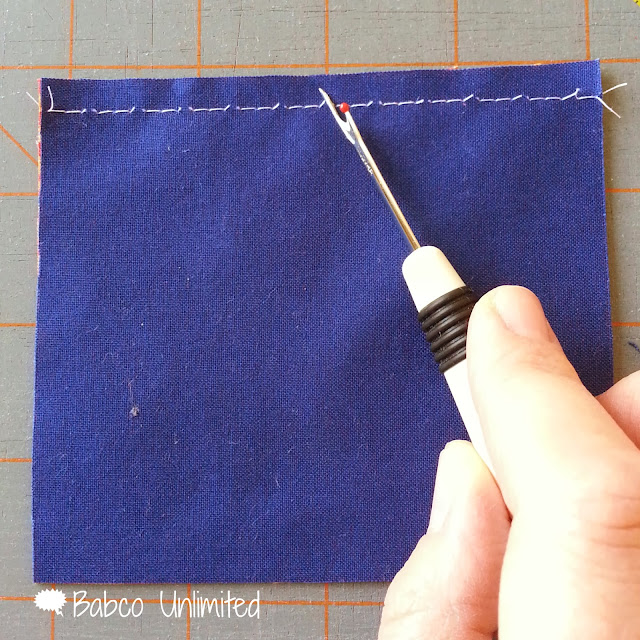
First, use the seam ripper to cut every 3 to 4 stitches on just one side.
BabcoUnlimited.blogspot.com - Tuesday Tip, How to Rip Out Stitches, Quilting Hack

  • STEP 2
Next, lightly pull apart the two fabrics. 


BabcoUnlimited.blogspot.com - Tuesday Tip, How to Rip Out Stitches, Quilting Hack


It comes apart so easily!


BabcoUnlimited.blogspot.com - Tuesday Tip, How to Rip Out Stitches, Quilting Hack

  • STEP 3
One fabric will have those small pieces of thread you cut. 
BUT--The other fabric will have one solid piece of thread.


BabcoUnlimited.blogspot.com - Tuesday Tip, How to Rip Out Stitches, Quilting Hack


Pull out that ONE long piece of thread.


BabcoUnlimited.blogspot.com - Tuesday Tip, How to Rip Out Stitches, Quilting Hack


  • STEP 4
Ta-Da! You have spent an itty-bitty amount of time to undo your mistake. Your fabric hasn't been pulled and distorted out of shape. And it is SO easy peasy!


Linked up with Stitch by Stitch here.
Linked up with Sew Fresh Quilts here.

Wednesday, January 22, 2014

WIP Wednesday #29 - Butterflies

I'm still gung ho about about my guild's UFO Challenge
I need need things like this to keep me focused and on task.

One of my goals is to complete my Butterfly quilt.
BabcoUnlimited.blogspot.com - Butterfly Quilt Block
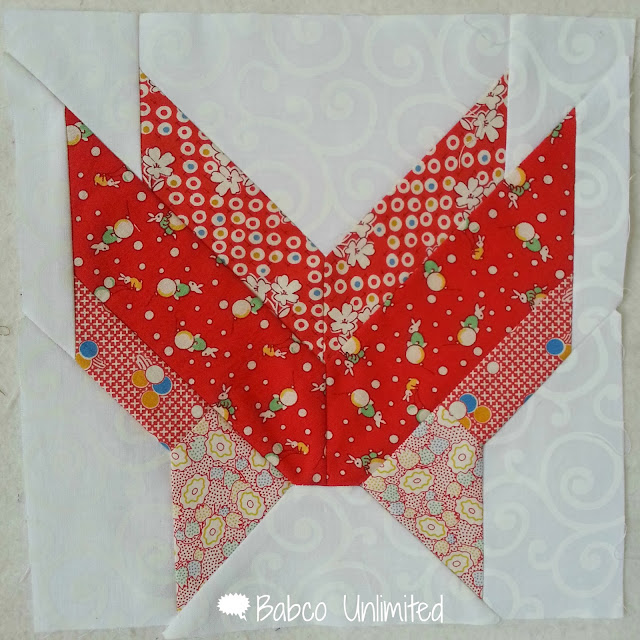
Red Butterfly Quilt Block
 I want to finish it in time for the Quilt Show at the Springville Museum of Art in July. I had only 2 blocks completed, so I have a lot of work ahead of me. 

But look what I've been doing!
BabcoUnlimited.blogspot.com - Butterfly Quilt Block


Oh, I just love them! I really, really do. I know I should be all modest and all, but I just love showing them off.  Each time I finish a block, I have to interrupt my husband to show it to him. And now I'm showing them off to you all. 

I really have to take my time on each block: I can't just whip them together. These blocks require y-seams, which I had never done before this project. Even still, I am having fun.

MK is keeping a close eye on this project as she knows this is for her.
She has asked for more pink butterflies. I'll see what I can do.

BabcoUnlimited.blogspot.com - Butterfly Quilt Block
MK and the Butterfly Quilt Blocks

Linked up to Sew Fresh Quilts here.
Linked up to Freshly Pieced here.


Wednesday, January 15, 2014

WIP Wednesday #28 - Pinwheels

One of the things I've been working on is my Pocket Full of Pinwheels project. This started as a class I took at QuiltFest. I wanted MORE pinwheels than what the teacher taught. So, I spent some time on quilt blogs and pinterest to find ideas of other pinwheels.

First, I did these simple pinwheels. And yes, I meant to do them going different directions. Because I can. 
BabcoUnlimited.blogspot.com - Pinwheel Quilt Blocks


These have to be my new favorite pinwheel blocks I've made.
I got the idea off of Gen X Quilter's Quilt Library. It is entry 317 called "Dutchman's Puzzle."
BabcoUnlimited.blogspot.com - Pinwheel Quilt Blocks


I didn't like the directions used for the block, so I developed my own.
When I make Flying Geese, I don't like doing the flippy corners because of the waste and because of sewing on the bias. I like the "no waste" method...which I had to adapt to make sure I got different colors for my "sky" to make the hidden pinwheel in the middle.

Have you tried the flying geese "no waste" method? It's so easy peasy. You can find a tutorial here.

I've got lots and lots of pinwheel blocks. So, now I'm laying them out to see how I want to arrange my quilt. While I was playing with my blocks, S came along and wanted to try to get them to all fit. 
BabcoUnlimited.blogspot.com - Pinwheel Quilt Blocks
Organizing the Quilt Blocks

S arranged and rearranged fabric for at least half an hour. It was so fun to see him crawling all over the floor playing with the layout. We still haven't committed to a specific layout, but we are getting ideas. 

Seeing it all laid out, I still think I want more blocks. So, I'm back to searching for more ideas.

Linked to Freshly Pieced here.
Linked to Sew Fresh Quilts here.

Tuesday, January 14, 2014

Tuesday Tip #3 - How to Make Your Quilt Seams Lie Flat Part 2

BabcoUnlimited.blogspot.com - Tuesday Tip, How to Make Your Quilt Seams Lie Flat, Quilt Hack
 

Last week's tip covered how to make just one seam lie flat. Today, I'll go over how to do this for your entire quilt. 

Most quilt books will tell you to sew a row of your blocks together and press to one way, i.e. all to the right. Then, you are to press your next row of blocks the other way, i.e. all to the left. I'm here to tell you this isn't the best way to do it.

Once I learned how to spiral my seams open for flat intersecting seams, I wanted to be able to do this will ALL my seams. It took me a while to figure out how to do this for an entire quilt or block. 
  • STEP 1 - ASSEMBLE YOUR ROWS

Sew all your rows together.
BabcoUnlimited.blogspot.com - Tuesday Tip, How to Make Your Quilt Seams Lie Flat, Quilt Hack


  • STEP 2 - PRESS BLOCKS IN ALTERNATING DIRECTIONS

Instead of pressing all to one direction, you are going to alternate directions you press your seams.
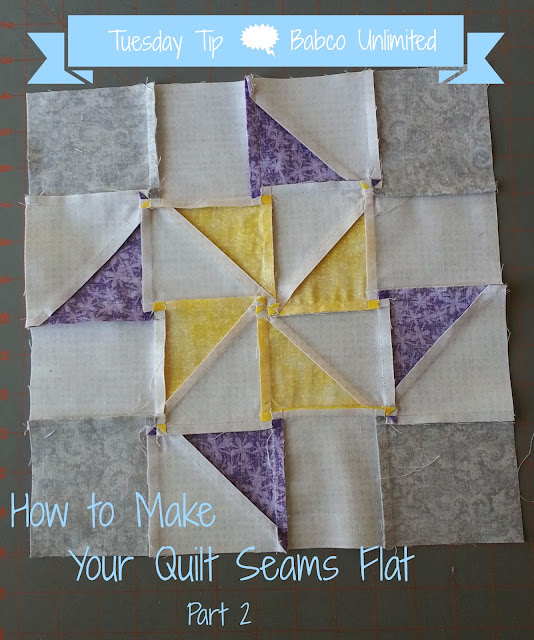
In this example, you can see the arrows pointing the direction I pressed the seams. 
BabcoUnlimited.blogspot.com - Tuesday Tip, How to Make Your Quilt Seams Lie Flat, Quilt Hack
 

Take note how the rows also alternate directions. This allows my seams to nest together when I sew my rows together. 

  • STEP 3 - SEW YOUR ROWS TOGETHER

Nest your seams together and sew your rows together.
BabcoUnlimited.blogspot.com - Tuesday Tip, How to Make Your Quilt Seams Lie Flat, Quilt Hack


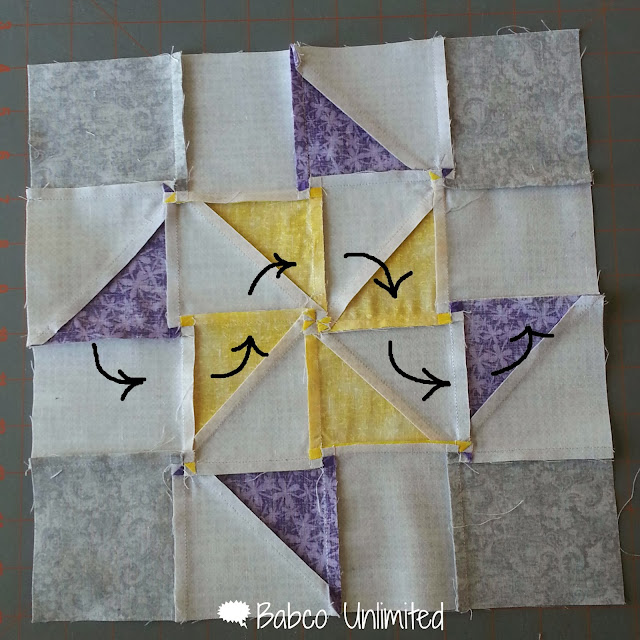
  • STEP 4 - SPIRAL YOUR SEAMS OPEN

Use the steps of last week's tip to spiral all your seams all open. 
BabcoUnlimited.blogspot.com - Tuesday Tip, How to Make Your Quilt Seams Lie Flat, Quilt Hack
 
Because we already pressed the seams in the rows to opposite directions, you will have an idea of how things should be pressed. You can almost make a path with your seams.

Here are a few examples of what you will do with your seams.
BabcoUnlimited.blogspot.com - Tuesday Tip, How to Make Your Quilt Seams Lie Flat, Quilt Hack
 

This will determine which way you will press the remaining seams.
BabcoUnlimited.blogspot.com - Tuesday Tip, How to Make Your Quilt Seams Lie Flat, Quilt Hack
 
You will have continuous spirals going on.

  • STEP 5 - SIT BACK AND ADMIRE

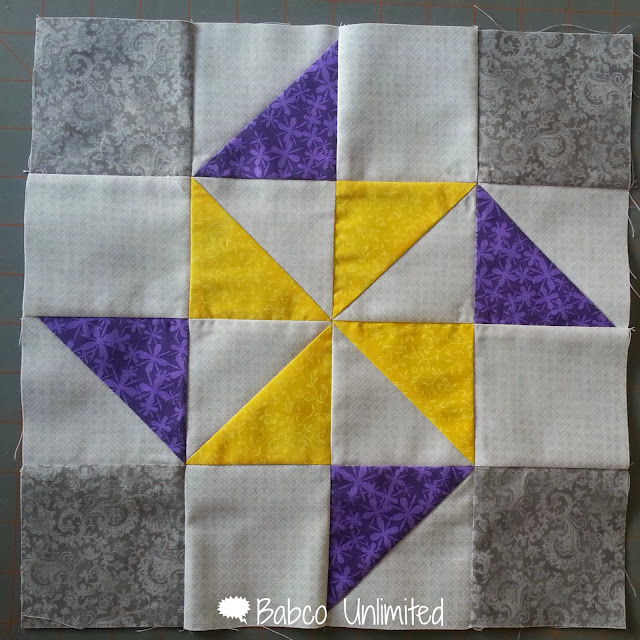
Once you've starched and ironed, you need to admire your work.
Look how flat that is!
BabcoUnlimited.blogspot.com - Tuesday Tip, How to Make Your Quilt Seams Lie Flat
 
Give it a try--you will be AMAZED at the difference it makes. 


Monday, January 13, 2014

UFO Challenge Accepted

Yes, I realize that most people do their New Year's Resolutions on January 1st. And--Yes, I realize we are a week and half into the new year. But it's never too late to make goals, right?

New Year's Resolution Humor - Be more awesome than last year!
In guild meeting on Saturday, we were issued a UFO Challenge. 

Rules:  1. List four projects we wanted to complete this year. 
2. Projects must be something we already have.
3. We are allowed one swap-out.
4. We must complete three out of the four listed.
5. We have three completion dates: May, Aug, Nov.
6. Finished is subjective: it could mean finished all the blocks, finished the top, or quilted and bound.

I'm signed up, and it is ON!

My UFO Challenge projects:

  • FRACTURED FLOWERS

BabcoUnlimited.blogspot.com - Fractured Flowers Quilt
Fractured Flower Quilt

This is just crazy--I'm so close, but I'm so angry at this quilt. 

  • WHEEL OF FORTUNE
BabcoUnlimited.blogspot.com - Wheel of Fortune Quilt
Wheel of Fortune Quilt
I'm having so much fun with this project, it's hard to stop.
I like the simplicity of this project.
  • BUTTERFLIES
BabcoUnlimited.blogspot.com - Butterfly Quilt Block
Butterflies

I want to have this finished for the Quilt Show a the Springvill Museum of Art in July and Quilt Fest in Sept. I've already dusted this project off and started to work on it again. I kept putting it off because of the templates. I needed to reexamine the templates I had made to make sure they were accurate. And I had two blocks I had to unpick and redo. Blargh. Never fun.

But now that I have the template issue sorted out, I'm loving this project again. 

  • POCKET FULL OF PINWHEELS
BabcoUnlimited.blogspot.com - Pinwheel Quilt Blocks
Pinwheels

Another fun one that is so close to finish.
I'm having fun with all the different pinwheels.


So there you have it. I'm really excited about this challenge. There will be prizes and drawings for those who participate. But also, I'll get some finished projects. I need things like this to keep me focused and on target.

Do you have quilting goals this year?
What helps you keep your Quilty New Year's Resolutions?

Linked up to Stitch by Stitch here.

Saturday, January 11, 2014

Baby, It's Cold Outside


What I did:
BabcoUnlimited.blogspot.com - Wheel of Fortune Quilt in Progress
Wheel of Fortune Quilt in Progress

(I just keep plugging away at my Wheel of Fortune quilt.)

What my kids did:
BabcoUnlimited.blogspot.com - Snow Day
(C, MK, and neighbors built a snowman)

Wednesday, January 8, 2014

WIP Wednesday #27 - Wheel of Fortune

I took a digital time-out over the Holidays. I was able to spend a lot of time with my family, enjoy the Holidays, and sew. Of course it seemed like the perfect time to start a new project...despite my ever growing list of WIP. What's one more project? Right?  I did work on some of my existing projects, but just needed something different to break up the "monotony" of working on the same thing.

I have been admiring this pattern for a while now. 
I found a free paper piecing pattern at quilter's cache here.

BabcoUnlimited.blogspot.com - Wheel of Fortune Quilt, 2 color Quilt, Pink & White Quilt
Wheel of Fortune Quilt in Progress

I've raided my scraps for any pinks. Then, I cut off about a 5" strip off all my pink fabric in my stash. I still have a LOT of pink to use up, which is a good thing since I want to make more blocks. I really should decide on how big I want to make this thing. For now, I'm just going to keep making blocks. 

I love the precision of paper piecing. 
And, I really like the secondary design that shows up--can you see the star that shows up in the negative space? 

As I'm piecing this, I'm starting to wonder how I will eventually quilt it. 
It's never too early to think about the quilting stage. 

The only thing I can think of at this time is doing a spiral out from the center of the wheel. But then what in the "star" area? Hmmm.
BabcoUnlimited.blogspot.com - Wheel of Fortune Quilt, 2 color Quilt, Pink & White Quilt
Wheel of Fortune Quilt in Progress

Any ideas out there? I'd love to hear your thoughts.
Have you seen the Wheel of Fortune quilted? What did you like about it? What didn't you like?
All the examples I've been able to find are just the finished top, not quilted.

Linked up with Modern Traditional Quilts here.
Linked up with Freshly Pieced here
Linked up with Quiet Play here.


Tuesday, January 7, 2014

Tuesday Tip #2 - How to Make Your Seams Lie Flat Part 1

BabcoUnlimited.blogspot.com - Tuesday Tip, How to Make Your Quilt Seams Lie Flat, Quilt Hack


I had no idea I was doing my seams ALL wrong. I was following the directions in all the Quilt Books, which instructed me to just press the seams all one way and then all the other way. When another quilter let me in on this trick, I was flabbergasted. What? The quilt books are wrong? Yes, yes they are.

I was also VERY skeptical about this idea because I was to unpick (UNPICK!) into my seam allowance--the stitches holding my seams together in the "just in case" area. Wasn't that against the quilting rules? Also, I just didn't think it really mattered. But you know what? It really does. I can't help but now notice all the non-flat seams in all my finished quilts now--oh, the agony!

Just look at the difference! This is actually the exact same block, just pressed differently. 
BabcoUnlimited.blogspot.com - Tuesday Tip, How to Make Your Quilt Seams Lie Flat, Quilt Hack


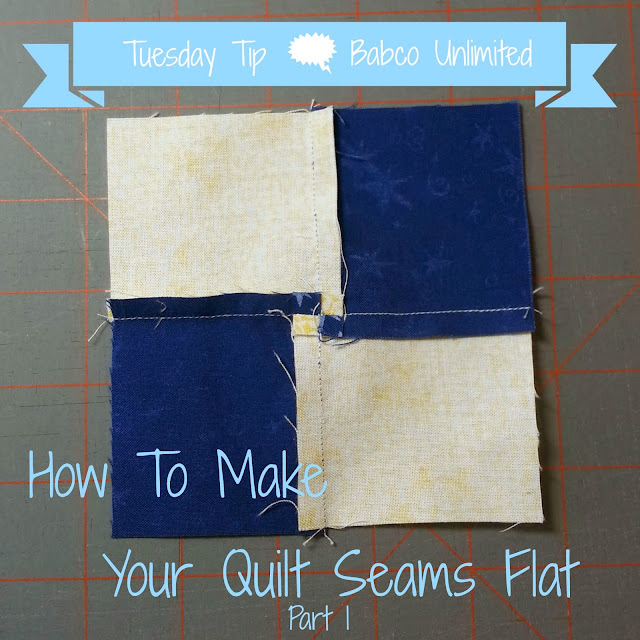
So how does one accomplish this amazing feat? I'm glad you asked. I made a simple 4-patch to illustrate how this is done.


  • STEP 1 - UNPICK YOUR STITCHES IN THE SEAM ALLOWANCE
At the intersecting seam, you want to unpick those 4-5 stitches past the seam allowance. You aren't unpicking stitches holding the blocks together--you are unpicking those "extra" stitches you stitched over.


BabcoUnlimited.blogspot.com - Tuesday Tip, How to Make Your Quilt Seams Lie Flat, Quilt Hack

BabcoUnlimited.blogspot.com - Tuesday Tip, How to Make Your Quilt Seams Lie Flat, Quilt Hack


  • STEP 2 - SPIRAL YOUR SEAM OPEN
Because you nested your seams while sewing your 4-patch, two seams are already going opposite directions. In my picture, you can see how the yellow seams are going opposite directions--that is because before sewing the 4-patch I had pressed those seams so I could nest them together to match the seam.

BabcoUnlimited.blogspot.com - Tuesday Tip, How to Make Your Quilt Seams Lie Flat, Quilt Hack


Next, you are going make the other 2 seams go opposite directions as well.  The easiest way to do this is to spiral the seams. See the arrows? They are going in a circle following the direction already set by the yellow seams. 

BabcoUnlimited.blogspot.com - Tuesday Tip, How to Make Your Quilt Seams Lie Flat, Quilt Hack


Because we are spiraling the seam, we now know which way the blue seams need to go. You can also stick your finger inside all those seams and move your finger in the spiral motion, helping those seams open. And LOOK! The middle seam is starting to open up. This is when you yell "Wa-Hoo!"

BabcoUnlimited.blogspot.com - Tuesday Tip, How to Make Your Quilt Seams Lie Flat, Quilt Hack


You know you have it correct when you see the opposite pattern in the open seam. Can you see the mini 4-patch in that open seam? That's what you're looking for. 

BabcoUnlimited.blogspot.com - Tuesday Tip, How to Make Your Quilt Seams Lie Flat, Quilt Hack


  • STEP 3 - ADD A LITTLE STARCH (OPTIONAL)
This step isn't absolutely necessary, but I find it very helpful. I spritz a spray of starch (my fav is Best Press) to keep the seam open and in place.


BabcoUnlimited.blogspot.com - Tuesday Tip, How to Make Your Quilt Seams Lie Flat, Quilt Hack


  • STEP 4 - IRON 
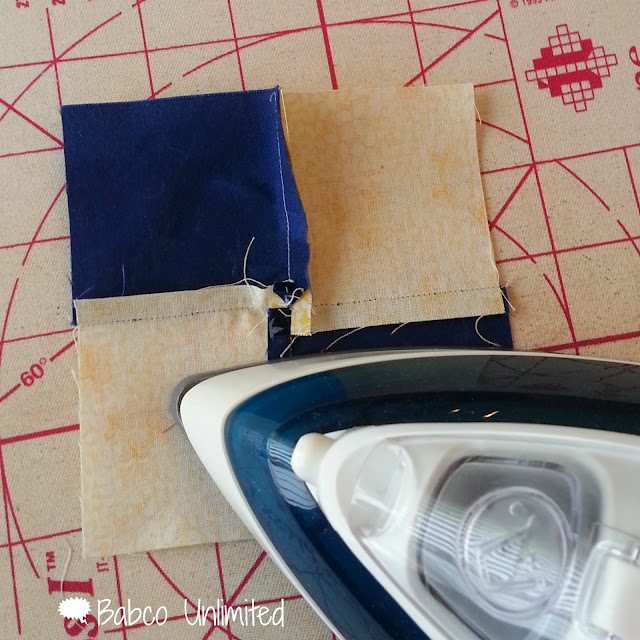
Next, you need to iron the seams in the spiral direction you predetermined. I iron the seams on the back side of the block, then I press the center intersecting seam using the starch to press it flat. 


BabcoUnlimited.blogspot.com - Tuesday Tip, How to Make Your Quilt Seams Lie Flat, Quilt Hack


I then press the front side of the block.

  • STEP 5 - STEP BACK AND ADMIRE 
Yes--this is an important step. What fun is it if you can't admire your own work? 

BabcoUnlimited.blogspot.com - Tuesday Tip, How to Make Your Quilt Seams Lie Flat, Quilt Hack


Give it a try! I wasn't convinced until I tried it myself and could see and feel the difference. So much of quilting is texture and touch. We have to feel it.

Have you tried this? Do you like it? What other steps have you taken to make your seams lie flat? 

Next week, I'll talk you through how to do this for an entire project in Part 2.  

Linked up to Stitch by Stitch here.
Friday, January 3, 2014

First!

Today, the kids ran to the car in an attempt to be first.

MK: (slamming into the van first) FIRST!
S: (makes a show of touching the van) 52nd!
 photo tw_1.jpg  photo fb_1.jpg  photo ins_1.jpg  photo bl_1.jpg  photo tum_1.jpg  photo gplus_1.jpg  photo pin.jpg  photo yt.jpg